
Friday, November 18, 2016
Monday, June 24, 2013
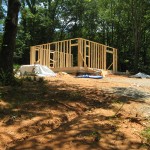
Almost Finished Framing the First Floor

So I started framing the first floor. And, since I’ve never done framing before of this magnitude, I figured I would build out 12′ sections, raising them myself and see how it goes. It went pretty well. In fact I am 4 wall sections away from finishing the first floor framing. I even took a little video for everybody to see it. It took me a good solid day, about 10 hours to get this framing you see here in the pictures done.

Before I start getting comments like “Hey, where’s the header on that window?”, or ” You forgot a couple 2×10′s on that door header!” I didn’t put all the headers on so the weight of the wall wasn’t more than I could lift up on my own. I was a little nervous lifting that first section, but once I got the hang of it, the lifting of the walls went well.

The most time consuming thing about the framing the walls are the door and window openings. Doors require a header and trimmers while windows require cripples in addition to these. Trimmers go on the inside of the door or window jam and essentially hold up the header. The cripples support under the window opening under the sill. All the measurements and cuts are the most time consuming part, at least for a novice owner builder.
I posted a couple pictures of the windows I picked out as well. I’m going with a low to middle of the road window since I can’t afford to spend $10,000 on windows right now. I found a place in North Georgia that buys building materials, then sells to the public. I found these 6′ and 5′ windows for under $100 a piece. They are beige and they don’t have grates, like a lot of Georgia houses do. I didn’t want to buy white, builder grade vinyl windows, like you see everywhere around here.

I researched Silverline, the brand of window I bought, and they are made by Anderson. We’ll, Anderson bought the Silverline brand. I saw a lot of mixed feedback about the window brand, but at the end of the day I really can’t spend a lot of money on the windows or I won’t be able to finish the house. From what I could examine and from what other builders I’ve met could tell me, these windows blanket GA in a lot of subdivisions and held up to be a pretty okay window. For the better window you have to spend more, so maybe down the road I’ll get better ones if they don’t live up to what I’ve heard.
I’ll post the video in a little bit in the video category I am building now. Thanks for stopping by. Comment or ask questions.
Floor System Joists and Girders

The floor system for the first floor is almost finished. I’ve been working on it for about a week and a half because I have been fighting the rain. Every time I get busy, I’m held up by rain. Plus, I’m Mr. Owner Builder – Do it Yourselfer on this, so I am handling all of the work on my own.


I’m using 3-ply 2×12′s as my girder, glued and nailed together spanning the 24′ and supported at 8′ intervals. It’s a little over engineered, but I wanted a strong floor. I’m using #1 pine 2×10′s as my floor joists with the longest span at 13’6″. I wanted the house to be closer to the ground, so I’ve opted to hang the joists from the girders instead of resting on top of a girder. The building code calls for joists to have a 18″ clearance and girders to have a 12″ clearance in a crawl space. So, I made my girders 15″ so I have 18″ to the joists at the very lowest point in the crawl space.

The joist hangers are Simpson Strong-Tie LUS210Z 2×10 joist hangers. They require 10 nails in each hanger, so the bulk of my time has been spent banging these in. There is a little trick to these that I didn’t know, but quickly figured out. There is a cut out piece of metal that is bent in and angled toward the direction of your girder. Once you line the joist hanger up, you can easily hit this metal piece and it drives it into the girder as a sort of temporary staple. It WILL NOT hang on for long if you’re hanging joists on both ends. As soon as you knock the other end, your opposite side will pop out with the smallest vibration. I knocked these metal staples in, then nailed in the top two nail holes on either side of the hanger then went over to the other side to line up the joist on the opposite end.

I’m at my wits end with the rain because I put that 6 mil plastic down, so if water gets in there it will just puddle up and have nowhere to go. But, once I put the floor down and screw everything in I am going to put some plastic over it all, then it can rain all it wants. I’ll just get frustrated when I start working on the second floor. Here are some pictures of my progress with the floor system.
Sunday, June 23, 2013
This Foundation is Still a Work in Progress

I am still working on the concrete block foundation wall. I am filling some of the cores down to the footer with concrete and seal up the others with a top layer of concrete in all the cores on the top course.
I know I’ve posted this last week, but I am hoping to finish this tomorrow. I was supposed to have a hired hand, but he didn’t show up last week. I have 2×8 pressure treated boards sitting there on the property for the sill and I am also sitting on go to have my other lumber delivered, it’s itemized and ordered, just need to have it delivered.
Doing most of the work yourself takes time. I’ve been contacting some other local Georgia companies I’ve found on craigslist who have unused building materials. Aside from lumber, there is a load of stuff out there for the house at huge discounts off what you would pay at a building supply store like Lowes or Home Depot.
I’ll check back later and post some more pictures, maybe even some video. I keep forgetting to get my Flipcamera out of the car.
Concrete Block Crawl Space Foundation

I wanted to check back in and include some pictures of my block work. I’m building a crawl space foundation, mainly because I don’t want to seal up all of my pipes for water, sewer, and electrical, but also for the HVAC to run from the floor up instead of the roof down since we know that cold air sinks and hot air rises.
Laying this concrete block has been very time consuming. I really want to get it right the first time, so I’ve been meticulously laying each block, making sure they are all level and square. This is very time consuming work.
My Block Laying Process Went Like This…
1.) I let the footer cure for a few days. I know I didn’t have to let it cure so long, but I was busy anyway. In case you were wondering, footings in my county need to be 8″ deep by 16″ wide, I made mine 10″ deep by 20″ wide with two pieces of rebar all the way around. I also set vertical rebar every 6′.
2.) I laid down a 1″ thick bed of mortar for the bottom layer or first course of block. I painstakingly leveled every block like I was building the great pyramids.
3.) I got to the first block I laid and… SURPRISE! It was level! I felt like I had accomplished something, then I realized I had to do it again for second and third course.
4.) I applied an water sealer to the 1st layer of block and footer I had poured since there was some rain in the forecast.
5.) I added ladder reinforcement in between the second and third course, as seen in the photo below. I plan on filling the cores every four feet, from the footer up where I have my vertical rebar embedded in the footer, as well as filling the top course to create what is called a bond beam around the entire wall.
6.) I left spaces where I would have to add venting.
7.) I made sure everything was level with a masonry string with a line level and also 4′ long level.
I’m still working on finishing the block work but it’s raining today. I figured I’d take a couple minutes and upload some pictures to share if there is anyone out there reading this already. I know Google picked my site up and indexed all of my categories. I checked the traffic stats and it looks like you are out there reading. Share some comments.
If you’re looking at the picture and saying, man that hill looks like it sends water right down to the house, I have a small v shaped trench over there now and I do plan on grading that hill down even further to make sure water goes in the opposite direction of my house.
Saturday, June 22, 2013
Laying Concrete Block
So, I’m embarking on laying concrete blocks tomorrow. I’m laying 3 courses of 8x8x16 concrete blocks for my crawl space foundation. This should be a simple owner builder project since it’s done little by little, you can really get precise with your mortar joint. I’m sure a contractor in the business of laying block could do this in a few hours. I actually had a guy call me to offer to do it for $600 who’s been in the business for 15 years. He claimed he could lay 780 blocks in an 8 hour day. If that’s true, that’s a lot of block.
I have vertical rebar that I put in the wet concrete before it cured. I layed out some blocks dry today to make sure it all lined up square… it does. So, I’m off to the races tomorrow. I’ll post back soon to let you know how it goes. Hopefully it won’t be that difficult. I’ve watched a ton of youtube videos including one basement windows video and re-read my block section in my owner builder book. Until tomorrow.

I had a good rain come today, so yesterday and the day before I was able to do the first course and get some waterproofing down. I wanted to get it done and back-filled before the rain hit, but it just didn’t happen. I really wanted to give up and just hire someone, but an owner builder must push forward. Getting it done quickly is not what it’s all about, it’s about getting it done right the first time. Although I really want to get it done quickly, I have to concentrate on taking my time.
Concrete block should be spaced apart with 3/8″ gaps, so I bought a 3/8″ rod at the hardware store to space out my block before applying mortar to make it permanent. It seems to work really well. I saw online, there is a company that sells 3/8″ metal spacers to make sure your other courses are exact, but I think I’m going to just try to get it right with my trusty metal rod and a tape measure.
I was happy when I got all the way around to the first block I laid and they all lined up level. Second course and third course of block will go up next week. This weekend it’s storming, so I’m stuck inside with the kids.
I have vertical rebar that I put in the wet concrete before it cured. I layed out some blocks dry today to make sure it all lined up square… it does. So, I’m off to the races tomorrow. I’ll post back soon to let you know how it goes. Hopefully it won’t be that difficult. I’ve watched a ton of youtube videos including one basement windows video and re-read my block section in my owner builder book. Until tomorrow.

Laying Concrete Block is VERY Time Consuming
Laying concrete block is a lot more time consuming than I thought. You have to get that first course down level and it’s a lot harder than the pros make it look. It is doable though, it just takes much longer.I had a good rain come today, so yesterday and the day before I was able to do the first course and get some waterproofing down. I wanted to get it done and back-filled before the rain hit, but it just didn’t happen. I really wanted to give up and just hire someone, but an owner builder must push forward. Getting it done quickly is not what it’s all about, it’s about getting it done right the first time. Although I really want to get it done quickly, I have to concentrate on taking my time.
Concrete block should be spaced apart with 3/8″ gaps, so I bought a 3/8″ rod at the hardware store to space out my block before applying mortar to make it permanent. It seems to work really well. I saw online, there is a company that sells 3/8″ metal spacers to make sure your other courses are exact, but I think I’m going to just try to get it right with my trusty metal rod and a tape measure.
I was happy when I got all the way around to the first block I laid and they all lined up level. Second course and third course of block will go up next week. This weekend it’s storming, so I’m stuck inside with the kids.
Digging Footers in Georgia Clay

When I graded down, I took out about 4 feet of clay to get my home site flat, and moved the dirt outwards to create a gradual drop in elevation in all directions from my house. This way, my house is not just sitting on the top of a hill.
I marked out all my corners and put up my batter boards. I put the batter boards up far enough out so I would avoid hitting them when using the excavator. The point of batter boards is to establish square and level and be able to put your strings back up at any time to reference at any time.
Since I’m an owner builder and never operated an excavator before, I went for a slightly smaller excavator, the Powerhouse PX-10 with a 12″ bucket. My footers were to be 20″ wide and I need at least 12″ below grade. Footers in my county need to be 16″ wide x 8″ deep, I went 10″ deep and 20″ wide.
I practiced digging in an inconspicuous area in my yard for a few minutes, then came back to tackle the footers. It wasn’t the prettiest once it was done, so I went back with shovels and squared it off real nice and leveled it up. It took me about a day to complete the footers.
I opted to put two pieces of 1/2″ rebar in a continuous run around the entire building in addition to steel fiber mesh in the concrete. Once everything was in, I remembered that I wanted to put a 6 mil plastic down to protect the footers from any water in the future, so we pulled some under the rebar before the pour the next day.
I called around and haggled on the concrete and got a price of $105 a yard, nylon fiber was another $6 per yard. I calculated how much concrete I needed by using this concrete volume calculator and figured I needed about 7 yards.
The morning of the pour, I will admit that I was a little nervous, I’m an novice owner builder, I’m no concrete contractor, but this is a pretty simple pour. I watched tons of videos, read through my owner building book and checked and rechecked my level lines.
Once the lines are up and level, you measure down as to the depth of your concrete. We poured a little, spread it out, all while checking the measurement from the line for level. We got to the end and put a little extra concrete into the trench to work with once the truck left… You can always take concrete out, but once the truck leaves you can’t put anymore in.
Quotes I received to contract out the footers were $4500-$5000. My cost was $1200 for everything: concrete, excavator rental, a buddy to help me, rebar, plastic liner… and my labor was free :) I still need to build my stem wall for my crawlspace, so I expect to spend another $450 on block, 3 courses high. I am still in the mega savings zone.
Subscribe to:
Posts (Atom)